Monday, July 25, 2016

Season 2 Guild Plots

Several months ago near the beginning of the year I wrote an article talking about the Season 1 Guild Plots. I broke down each of the plots into categories, analyzed each one, shared my opinions on the best and not-best uses, then ranked them. Although it was not my most viewed Guild Ball post it was a fairly popular one.

Season 2 is not strongly underway and we have a new set of 12 Guild Plots to pick from. The new plot cards have shifted in a couple ways from Season 1 and the focus is different. They fulfill the same role, but with an arguably less and definitely different impact to the game. It's time to jump in and take a look at what we have and share my opinions on the best and worst to choose.

Season 2 Guild Plot Overview

I recommended that the Season 1 plot cards be added to the game once a new player has 3-4 games of experience and I continue to believe this is the best time to add them. Complicating the game for new players is not necessary or encouraged, and Guild Plots add both complexity and new tactical choices.

We see a design shift in the season 2 plot cards nearly removing two common aspects we saw in during Season 1. First is the dodging and extra movement we saw with cards such as "Don't Touch the Hair" and "Knee Slider".  We also see a near removal of the recovery style cards with the exception of "Husbandry", which is adjusted to return a Mascot but only at 1 health box. The Season 2 cards have shifted focus toward bonus's when played in response to opponent actions instead of on-table direct reactions such as movement or extra healing.

Another design decision was made to create cards with little or no way to counter what they do. Few of the Season 2 plot cards are triggered by actions that can be avoided in a successful game. There are also few (only 1) cards which can be countered by increased range models bring the target of the card. Overall there is very little that can be done in Season 2 to mitigate the use of a plot card.

The season 2 Guild Plots can be roughly split into three categories plus Husbandry:
  • Momentum: Immediate Response, Get it Back, Home Crowd
  • "Free" abilities: Too Flash, Steamroller, Nuts!, One Touch Football, Tracking Back
  • Bonus: Give as Good as You Get!, Damage Sponge, Tap In
  • Other: Husbandry
Of these there are only 2 plot cards which are truly "offensively" focuses and 2 which are "defensively" focused, using the categories from my original article.  It appears that the game designers wanted to reign in some of the direct impact the plot cards had on the game, making them less "active" overall and more of a lesser "buff" to the team holding the card.

Momentum Guild Plots

Immediate Response - Immediate Response is a universally good plot card, on that is among my default picks when I have the choice. This gives the player 2 momentum points in response to an opponent taking-out a friendly model or scoring a goal. The dual nature (take-outs and goals) of this card combined with gaining 2 momentum is very strong.

In the event this is not in your hand you should assume it's one that your opponent has chosen. That said, unlike the Season 1 plot cards, there is nothing you can do to counter this. Be aware that at some point your opponent could make a 2 MP jump in response to you earning VP and move on with your game. I do not recommend factoring this heavily into any plans aside from awareness.

Selection Priority: Tier 0 - always choose

Get It Back - This plot card requires your opponent successfully tackle the ball from one of your players, at which point you can gain a (1) momentum point. Due to the requirement of a successful tackle and the timing for counter-attacks, this plot card will not do as described and help you regain possession of the ball. It will give you a boost in your momentum pool for future actions during the turn. If your playing against a team with heavy tackle abilities such as Fishermen, Alchemists, team builds featuring Mist or Snakeskin, or footballing Masons or Brewers this is a good card to take. Considering there is no requirement for the Tackle to be a "playbook tackle", this card works vs "Balls Gone" and similar character plays.

This is another card where the only response is awareness. It should not influence your plans for tackling the ball from your opponent, and will not directly respond to that Tackle. 

Selection Priority: Tier 2 - I often choose this card when its available

Home Crowd - Home Crowd is a must take card when it shows up as a choice in your Guild Plot selection. This card grants the player who loses initiative 1 momentum point at the end of the Maintenance Phase. One key consideration is that this is granted upon losing an initiative roll, so cannot be used on the first turn when losing the kick-off roll. Aside from turn 1, this changes the dynamics of losing the initiative roll by granting an immediate counter-attack opportunity or an early turn goal-threat without the need to generate the momentum elsewhere.

Sticking with the theme of the Season 2 plot cards, there is nothing you can do to counter this. You should assume that if it was not in your selection then your opponent has chosen this card. Keep a watch for oddly placed goal-threat models holding the ball at the start of a turn. A goal-threat holding the ball without a direct path to generate momentum then score is typically a sign that you're opponent is waiting to play this card. Aside from that, be aware that getting initiative during a turn may not make you immune to counter-attacks for an activation, possibly shifting your plans for the first activation.

Selection Priority: Tier 0 - always choose

"Free Abilities" Guild Plots

Too Flash - This is a plot card that you will choose more often based on the skill of your opponent. Too Flash becomes incredibly powerful in the event your opponent uses Teamwork momentous actions, and less so if your opponent doesn't. Teamwork actions are "Give 'n' Go", "Pass 'n' Move", and "Snap Shot". On "Give 'n' Go" and "Pass 'n' Move", the model that makes the dodge will be the model receiving the Too Flash token. On "Snap Shot" it will be the model making the shot on goal. Once the "Too Flash" token is on a player it can be used by other friendly models to reduce a Charge by 2 influence, making it cost (0). This means that Fear and other abilities that increase the cost of Charges will still do so.  This "free" charge can be very powerful regardless of the type of team (Goal scoring or Take Out) your playing.

Be aware that Too Flash could be in your opponents hand if it was not one of your choices. Using the Teamwork action on a model with "Unpredictable Movement" or a high defense is typically the best choice in countering this card. Be aware of your opponent holding onto a card if you're not using many teamwork actions, that's a sure sign they chose this plot and are waiting for the best target to put it onto.

The section priority for this plot is going to be completely dependent on your opponents skill level in the game. The greater the skill of your opponent the more often they will use teamwork plays to position their players. Don't jump at the first opportunity to use this plot card, instead carefully target the players you will benefit the most from having a free charge against.

Selection Priority: Tier 1 - when playing a more experienced player or in a tournament
                               Tier 3 - when playing a less experience player

Steamroller-  This plot grants a single use of "Anatomical Precision" or "Forceful Blow" to a charging model after the charge is declared. These abilities are both strong on any model that's charging. "Anatomical Precision" will remove 1 armor during the attack, increasing the number of hits when you're typically rolling the greatest number of dice. "Forceful Blow" will add an additional 2 points of damage to a charge attack (when damage is already dealt) along with pushing the target up to 2 inches directly away. Both of these abilities are very strong and being able to choose between the two on declaring the charge is ideal. It's particularly useful to remember this when charging with a 2-inch reach model, as a 1-inch reach target can be pushed out of their range, stopping the counterattack.  

Selection Priority: Tier 1 - one of the best plot cards to choose regardless of play style

Nuts! - This plot card is triggered by an enemy model declaring a parting blow, and grants the friendly model targeted Close Control for the remainder of the turn.I'm not often finding a large use for this card, although it appears on first read to be an amazing choice. In one situation where a model is holding the ball and has activated to move toward a pass or goal, "Close Control" is a fantastic ability. The challenge here is that these models will typically have some type of dodge or other ability to disengage from combat without suffering the parting blow in the first place. They are also typically models that are lower in health and do not want to suffer damage in lieu of just dodging out of combat. Another situation where this card may be amazing is a model that does not have the ball but you want to hold the ball later in the turn. In this case they will disengage and suffer the parting blow during their activation, play this card, then sit in an ideal place to hold the ball for the rest of the turn. Later in the turn another model will pass the ball to this model to park it there. The problem with this plan is the set-up involved and the limited time (until the end of the turn) that "Close Control" will be in effect.

Selection Priority: Tier 3 - Ok to play around with, possibly good with a specific plan.

One Touch Football -  This is a really good plot card on any team with at least 2 good ball-passing models included in the line-up. This plot card allows for a ball carrier to pass the ball to a model, play this card, and generate an immediate free pass to move the ball again. The trick is that the receiving model cannot use a Teamwork action such as "Pass 'n' Move" or "Snap Shot". However, this does not stop the kicking model from using "Give 'n' Go" to dodge 4 inches after the kick, nor the second receiving model from using "Pass 'n' Move" or "Snap Shot". There are so many uses to this plot it would make a great short article on it's own.

Selection Priority: Tier 2 - really good card when you have at least 2 reliable kicking models

Tracking Back -  This plot card grants "Goal Defense" for the remainder of the turn to a friendly model who ends their movement within 4 inches of the friendly goal. The prevalence of Avarisse & Greede being played at tournaments creates numerous opportunities to use this card. The real question becomes if it's better than any of the higher ranked cards available. It's a good card to take against goal-scoring teams such as Fishermen, Alchemists, and certain Masons Builds. It's particularly effective when facing a goal-scoring focused Morticians team, considering their limited kick dice.

Selection Priority: Tier 2 - better when facing a goal-scoring team

Bonus Guild Plots

Give as Good as You Get - On declaring a counter-attack you can play this plot card to add +2 to your TAC for the duration of that attack. This gives a nice boost to your counter-attacking model as long as you're able to complete the counter-attack. The key is to think about how often your actually declaring a counter-attack and successfully delivering on that declaration. How often are your opponents knocking you down (lots when facing Butchers) or dodging away (Fishermen, Hunters, Alchemists) from the attack. This card is more powerful the less often your opponent actively tries to mitigate the opportunities for counter-attacks.

Selection Priority: Tier 3 - good card but very dependent on the skill of your opponent.

Damage Sponge -  This plot cards allows you to add +1 Def when an enemy declares an attack against one of your friendly models. This does not work when targeted by a charge (the opponent declared a charge, not an attack), or a Parting Blow (same theory, declared a parting blow), or a Counter Attack. There are very few games when your opponent will not be attacking you at some point, and that makes this a top tier card choice.

Selection Priority: Tier 1 - almost always choose


Tap In - Tap In is a great plot card which is useful for every team and almost always a good choice. Tap In suffers from comparison to other cards and while an excellent card on its own, it often is just not as strong as others. It's going to add a bonus (-1 TN on goal shot) when you're close to the opponents goal, but the question becomes is that a better choice than other cards. This would have been a stronger rated card in Season 1, but in the Season 2 selection it's fairly average overall.

Selection Priority: Tier 2 - Good card, but situational and tough against the competition of other good Season 2 cards.

Other Guild Plot

Husbandry - This plot card was one that stuck out to me as an amazing card when I first looked at the Season 2 plot cards. I played it in my first couple games and each game I became less enamored with it. Overall it's the only card that is just not great in the season 2 plot cards. This plot card allows you to bring back a Mascot to the game after they've been taken out. This is amazing, until you dig into the remaining conditions. The Mascot returns to play on 1 Health and still awards victory points for a subsequent take-out. This card requires the immediate use of an activation and 1 or 2 momentum to heal up the mascot in order to not immediately award additional easy VP to your opponent. Some Mascots are very good in the game, but rarely are they useful enough to bring back with Husbandry. Had this brought back a Mascot at half health or even 4 health it would have been an amazing card, and a much higher priority and harder choice.

Selection Priority: Tier 4 - no matter what your plan is (i.e. loved creature) it's not worth it

Final Standings

There's my thoughts on the Season 2 plot cards. As before, my ratings start at Tier 0 rating for an always choose to a Tier 4 rating, with the lower rating being more desirable. As a quick summary, here is how the ratings came out:
  • Tier 0 - Immediate Response, Home Crowd
  • Tier 1 - Too Flash*, Steamroller, Damage Sponge
  • Tier 2 - Get it Back, Tracking Back, One Touch Football, Tap In
  • Tier 3 - Too Flash*, Nuts!, Give as Good as You Get,    
  • Tier 4 - Husbandry
We see a more balanced distribution of cards, and the 2 Must Take Tier 0 cards are not as game disrupting as "Don't Touch the Hair" is.


Monday, July 18, 2016

Guild Ball - Must Take Players?

I struggled to determine how to classify and tag this post. On the one hand I'll be talking about tournament strategy a bit. It'll be a look a Guild Ball player who is quickly becoming a key choice for tournament players. On the other hand I'll be discussing how the idea of a "must take" player annoys me. After everything I decided to jump in and start writing, then made the decision after reading what came out. It ended up as I suspected, more ramble than either tactics or soap-box.


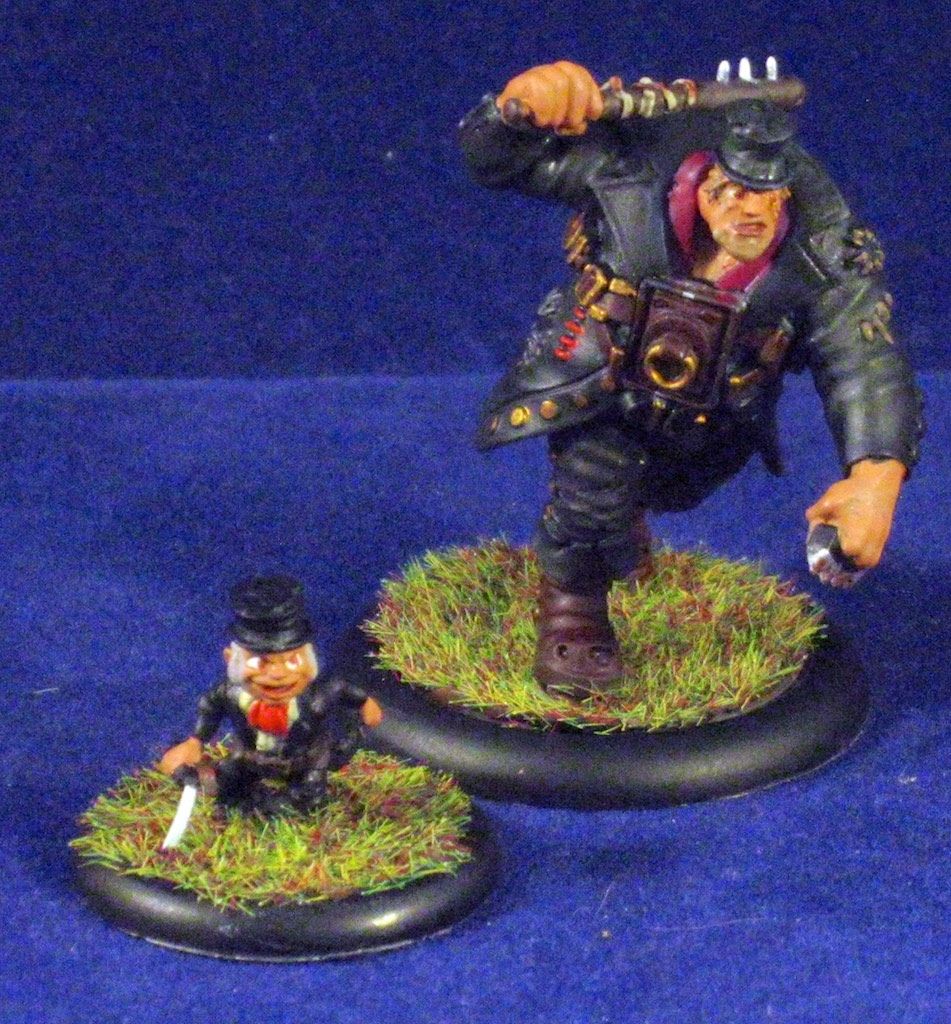
Don't those two look familiar?

I've been playing in a number of Guild Ball tournaments this year. I've tucked a total of 8 under my belt since January, averaging a bit more than 1 per month. In between those events I've also run 3 tournaments including the (to date) largest tournament in the US. The Guild Ball tournament scene is maturing in a very short time and trends are starting to emerge. One of those trends I've found myself partaking in, despite my annoyance. Avarisse and Greede have been showing up in more tournament teams with each passing event. This has to make one wonder what this player (these players?) do so well that they make it in so many lists.

Avarisse & Greede

Avarisse & Greede are a single player choice for a team roster who bring potential two players to the table. Through a unique ability called Detach on Avarisse a second player can be put on the table during a maintenance phase, making this player into two different models. Once detached Greede acts on his own and generates his own influence. Should you want to recombine them Greede has the Attach ability to combine the two players back together.

Starting with Avarisse we look at his card and see a typical big guy stat line with 20 health and a 3+/1 defense and armor combined with Tough Hide on the back of his card. We also see a single influence, but this is off set by detaching Greede for a second influence (while detached). A movement of 4 inches is not overly impressive, but the jump to 7 inches on the sprint/charge becomes respectable. Combined with his TAC of 6 we see a model that really wants to be charging.

Avarisse shines when you look closely at his playbook. The majority of his playbook is momentous and it's easy to focus on the top end results with both damage and double pushes. Considering he has a short playbook (TAC 6 playbook 5 long) this seems really good, but it's not the strength of the playbook. Non-momentous knockdown on 2 successes is really good when it comes to counter-attacks. Momentous Singled-Out is the gem of this playbook though. Adding 2 additional TAC to other models who attack the target is an amazing ability. This can really increase the effectiveness of other playbook plays and triggered character plays.

Switching to the smaller of the pair we take a look at Greede. First we should focus on the very impressive 5+ natural defense on his card. This spikes up to 6+ when he is within 4 inches of Avarisse. Overall Greede is slow with a relatively low TAC, a very low health of 4, and Crazy to increase his TAC. This means that his playbook is very long to match his Crazy triggered TAC of 8. Greede, who is already vulnerable to taking a hit during a counter attack, becomes even more fragile if you use Crazy to get decent attacks. It's unfortunate that there are so few decent momentous results on his playbook, making the choice to attack with him not one of the better choices. Along with his defense Greede's kick stat really stands out on his card. A 4/4" kick makes him very reliable kicking, but only over a short distance.

What's the big deal?

Sure, knockdown, pushes, and Singled Out are all good plays. Sure, Avarisse is a big guy with lots of health and tough hide. Is that enough to see them showing up in most tournament lists? Are people truly making incredible use of a 4/4" kick to get those crazy snap-shots? I'm fairly certain that none of this is the reason. The reason these are being added into so many lists is for the extra activation. Activation control in Guild Ball may not be as important as other games, but it can be critical in the early turns for specific game plans.

Typically use for Avarisse & Greede runs in a similar fashion regardless of the team they are playing on. During the first maintenance phase Avarisse uses Detatch to offload Greede onto the table behind him, typically in range of the friendly goal.  Avarisse may get an influence or not, and at some point during the turn he trundles up the board toward mid-field. During the turn Greede will move back within an inch of the friendly goal and hide there for the bulk of the game.

The usefulness here is to force use the extra activation to force your opponent to commit to their game plan and move up the board before you have to commit. This can give an advantage to any team who's plan benefits from taking the last activation or an uninterrupted final activation. Any Shock & Awe style game plan almost requires A&G on the team to assure maximum effectiveness.

Condition play focused teams such as Smoke led Alchemists, Alchemists teams with Venin, Hunters, and Fillet led butchers all make use of out-activating their opponents. Forcing conditions that cannot be removed before the end of the turn converts immediately to near guaranteed damage. Combining this with heavy momentum generation can deliver a devastating combo hit to a team as the conditions wear them down lining up multiple early turn take-outs.

First turn aggressive scoring focus teams such as Fishermen, Pin Vice led engineers, Masons, and Union or Mortician teams including Mist benefit from the final turn activation. These teams tend to aim for scoring late turn 1 to minimize the ability of an opponent returning a goal during the turn using the goal kick to get the ball down the field. If these teams can capitalize on the goal with initiative on the following turn they can retrieve the ball and possibly convert a second fast goal early on turn 2.

Aggressive take-out focused teams such as Butchers, Brewers, Masons, Morticians, and Union have a trickier time making the most out of the last activation. These teams typically need a way to increase their own threat range or to pull a target model toward them. Gutter and Minx can be great for this, as can Puppet Master (Obulus), Lure (Cosset), and Times Called (Spigot). Take-out plays can be particularly effective utilizing a final activation due to the amount of momentum typically generated. The momentum typically results in grabbing initiative on turn 2, allowing the team to do more damage or complete a take-out in the first activation of turn 2.


Thoughts

I don't like the whole philosophy behind must take characters. Aside from taking Masons I'm seeing A&G being added to lists partly to counter other lists taking A&G. I'm adding A&G to specific lists to compliment my strategies in the early turns. Once I'm into late turn 2 or later I'm using Avarisse to deliver Singled Out onto key targets along with an occasional knockdown. A&G activation control and Singled Out really compliments a Captain Rage led union team just as nicely as any Union team containing Mist.

I believe other people are starting to figure out how to use these two, specifically the strength that Avarisse brings with a single success momentous Singled Out. I've talked on Guild Ball Tonight about how I was having trouble figuring out how to use them well. Early on I was not getting a lot of value from the dynamic duo but have begun to learn how to use them over the past couple months. It's entirely feasible that others are following along the same track I am, learning how to use them well in similar timing. I hope this is the case as I'm sometimes seeing A&G in teams I'm not sure are the best fit. I'm still unsure if the extra activation is so strong in play that it needs to be countered. If this is the case it's a sad day for Guild Ball as A&G become must-take models and we'll start seeing team diversity decreases throughout competitive events.


Monday, July 11, 2016

Guild Ball - Captain Veteran Rage

I'm a bit surprised to find this article unfinished in my draft folder. I've been playing Captain Rage for a while now, although I cannot put my finger on how many games I've gotten in with him. I know I've used him at the "Get Over Here" tournament in April, which I won. I played him a couple games before that and have played him a fair bit since then. I also wrote a bit of an overview to my experience on the Guild Ball forums shortly after the GoH tournament.

Rage continues to be among my favorite Guild Ball characters, both in fluff and on the table play experience. Captain Rage delivers the same feeling and utility which Player Rage brings, but in a just different enough form to make him feel like a captain. Let's take a deeper look at him.

The Team

Captain Rage has the entire Union team to choose from, minus two characters in Blackheart and Player Rage. We can pretty easily remove Harry the Hat from the line-up due to how abysmal he is in the game. Even Captain Rage cannot redeem Harry into a viable spot on the field.

This leaves us with a mascot (Coin) and 8 players to choose from (Gutter, Decimate, Hemlocke, Minx, Mist, Snakeskin, Avarisse & Greede, and Fangtooth) to construct our tournament line-up. Although Strongbox will be added for a second mascot eventually, at the time of this writing he was not released yet. Looking at our choices I have settled into the following list for tournament play:
  • Captain Rage
  • Coin
  • Gutter 
  • Avarisse & Greede
  • Minx
  • Mist
  • Decimate
  • Hemlocke
Recent competitive games have developed my go to list as Rage, Coin, Gutter, A&G, Minx, with a single slot to be swapped between Mist, Decimate, and Hemlocke. Mist brings his very strong goal scoring to the field, along with a 2 inch reach which is helpful for Captain Rage. Decimate brings condition removal, which is especially helpful when facing Hunters and Smoke led Alchemists. Decimate brings additional damage to the team which is particularly nice against some opponents.

I'll point out that there is a community wide love affair with 2-inch reach. It's rated very highly by many members of the Guild Ball competitive community, beyond it's actual value in my opinion. 2-inch melee zone is useful, but the challenges it overcomes are not insurmountable. Savvy play can counteract the lack of wide-spread 2-inch melee zones on a team.

Readers will notice that there are 3 players who essentially fill must-take positions on my Captain Rage team. Gutter is the easiest of these to explain due to Cap. Rage reinforcing a primary role she was left with post-errata's. Gutter shines on this team through the use of Scything Blow combined with Cap. Rage's abilities. A&G are also becoming critical choices due to their ability to control activation. Additionally, Avarisse bringing "Singled Out" can add a tremendous bonus to both Cap. Rage and Gutter in terms of attacks and damage dealing.

The last "must take" of Minx is a bit more controversial for me. I originally was of the opinion that while she should be good on the team I could not find a space for her in my line-up. Mist and Decimate filled the remaining two slots (after A&G and Gutter), and Minx spent time sitting on the sidelines wanting to play. After a fair bit of theory and on the table play, Minx showed her value and truly shone as a key component to a Cap. Rage strategy. Minx brings two influence which she contributes to the team most turns, still using her Furious Charge to get into the fight and do some damage. More importantly, especially for 1st and 2nd turn, she brings "Marked Target". This ability to extend the charge ranges of the rest of the team by 2 inches dramatically increases the hitting power of the team. It also creates more challenges for the opponent, especially when they've carefully avoided the transitional threat ranges Gutter and Cap. Rage have.

Captain Rage Overview

Taking a look at Captain Rage's card we see the evolution from a player to a veteran player. His movement stayed the same but we see an increase to his TAC, additional armor, and a player level INF stat. This influence stat is particularly interesting because you'd expect to see it on a strong player, but it appears weak on a captain model. It's important to consider Furious when evaluating Cap. Rage's influence stat, giving him a no cost charge in addition to his influence.

Rage's playbook continue to impress, with momentous results in nearly every selection to be made. We see the addition of pushes to the third and fifth selections of the playbook, combined with the momentous damage. Cap. Rage becomes an even more impressive damage dealer when he can trigger his "Bloody Coin" ability, raising all his playbook damage by an additional point. This means he's regularly delivering 16 damage in a non-charge turn and statistically 20 damage on a charge turn. All of this comes with momentum generation each swing.

A discussion of Cap. Rage would be criminally incomplete without talking about his Character Plays. We see Concussion carried over as a playbook generated character play. This is potentially his least useful and least used character play overall. Cap. Rage has gained "Quick Time" giving him a 2 cost 2" dodge. This is very useful for a couple key situations which often arise. First, QT gives Cap. Rage the ability to extend his threat range or shift prior to charging, clearing a charge path or opening up a previously unavailable charge. Second, it allows Cap. Rage to deal with Clone and Unpredictable Movement.

Finally we come to one of the defining plays on Cap. Rage's card, Red Fury. This play gives Cap. Rage the ability to force a friendly model in 3 inches to make an attack without spending influence. This is particularly nice to use for triggering other models special playbook results such as Avarisse's "Singled Out", Fangtooths easy "Knockdown", and especially Gutter's "Scything Blow". It also gives Cap. Rage the ability to circumvent defensive abilities such as Fear by reducing the cost of the actual Attack to 0, despite Red Fury costing 1 influence.

I feel fairly safe in stating that all of this is not enough to put Veteran Rage at Captain level. Looking at the back of his card we see some additional abilities that bring him up to an expected level of impact on the game. I've already mentioned Furious, giving Cap. Rage a free charge in the same style as player Rage. He also brings Rising Anger to the table, potentially the most forgotten ability among Cap. Rage players. Lastly we see a unique ability, Usurper, which let's Cap. Rage prey on Union players brought to the table on opposing teams. Usurper gives Cap. Rage +1 TAC when making an attack against opposing Union models, bringing him to TAC 8 base.

We also have Cap. Rage's Heroic and Legendary plays, which are fairly well linked. His Heroic Play, "Bloody Coin" grants additional TAC and playbook damage when he is attacking a target engaged by another friendly model. This bonus is in addition to the "gang up" bonus already conferred to the attack. His Legendary play, "My Gang", confers the bonus of "Bloody Coin" to all friendly models within 6 inches of Rage. The application of this to Gutter in the ideal situation is particularly brutal, raising her TAC for each Red Fury attack to a 7 base (TAC 5 + 1 for gang up + 1 for bloody coin) and increases her playbook damage by 1. 

Opinion


I've really enjoyed my games with Cap. Rage. He brings a game of unadulterated violence to the table, typically ending a game on 6 take-outs opposed to 4 take-outs and a goal. His mix of abilities solves some of the typical problems faced by combat teams and he has abilities to mitigate opponent strategies for locking down furious models. He continues to act as a highly effective combat model in the vein with his player version, removing the limitations brought by Maverick and a single influence. He's player Rage with more Rage included to the game, which is just fun.

An additional facet Cap. Rage brings as a season 2 captain is increasing the involvement of his team. Although he appears as, and in fact is, a super-solo style spotlight captain he still increases the team play aspect. He can hold a maximum of 4 influence, typically leaving 7-8 influence to be shared among the remainder of his team. He also thrives on attacking models who are already engaged by a friendly model, increasing the importance and play of his team as a whole.

Monday, July 4, 2016

Book Review - Legacy of Shadows by Craig Gallant

I got Legacy of Shadow's shortly before the release thanks to the very fine folk at Winged Hussar publishing. I have been waiting for this novel since I first heard that Craig Gallant would be branching out to write his own series. I was not aware he was writing Science Fiction, but was excited to see what he put out regardless of genre. I've enjoyed Craig's other novels which were written in the Wild West Exodus universe, and really wanted to see what he would do once "outside the sandbox".

The Basics

This is Craig's first published foray writing for his own created universe. I've reviewed and am a fan of his previous work within the Wild West Exodus universe and am excited to see what he would do with his own. Authors of "sandbox fiction" can struggle when writing without the provided frameworks and guidelines of established canon. Legacy of Shadows gives us the opportunity to reengage with Craig on new ground, as if it was his first time out (again).
This is an excellent place to make a point about the book description on Amazon.
Skip the Amazon book synopsis!
I'm not sure what happened on Amazon, but the synopsis has two large issues. First, it's not accurate for this book. Second, it contains some spoilers for the book as a whole. 

Synopsis

Let's take a look at what the publisher provides as the synopsis:
Two men of earth stumble upon an artifact that bestows upon one of them control of and responsibility for an ancient space station that stands as the last bastion of freedom in the galaxy. He does his best, with the support of his friend and others he meets along the way, to fill the office until a suitable successor can be found, while the forces of galactic oppression move to use his presence as an excuse to crush the station. He battles determined enemies, betrayal, and his own inner demons to defend the position blind luck put him into, but in the process, he might have started a process that might destroy every human in the galaxy.
I like this synopsis, very straight forward and gives a good overview to the book opening. I thought I would take a turn at writing my own synopsis of the book:
Legacy of Shadows is a literary buddy film set to the backdrop of hardcore science fiction drama. The story opens with our two protagonists engaged in a frantic car chase ending in an explosive conclusion and alien abduction lifted straight from the big screen. The story rushes headlong into a well crafted buddy film narrative culminating in a massive battle ripe with evil galactic overlords, monstrous alien soldiers, space demons, and powered-armor soldiers fighting high-tech giant robots. 

My Thoughts

I took the time to read through this novel twice prior to writing this review. My first read through was voracious, devouring the novel in a fairly short time. My second read was leisurely, taking notes and annotating sections I particularly enjoyed or had questions about. This is a very well written book where the authors writing opens a window into the scenes playing out inside their head, inviting you (the reader) in to watch the story unfold.

I enjoyed the way Craig (the author) plays with well accepted American movie tropes, flipping several on their head. We have the dual-ethnicity (black / white) buddy team at the opening of the story, yet the aliens in the wider galaxy are horrified by the white character and accepting of the black. We have an entire race of warlike space daemons, horns and all, who end up as brave crusaders against the evil galactic empire. Overall, very little of this story is predictable, despite early appearances. Craig masterfully crafts a story where not even expecting a "reversal from expectations" will serve to predict the story. Despite the twists and surprises the overall story is easy to follow and understand.

Conclusion

I rarely read a novel more than once due to a variety of reasons. I picked out additional depth and details in this story on my second read through and was more pleased with the story afterwards. This is an excellent book and excellent start to an engaging future series. I strongly recommend anyone who enjoys science fiction or general buddy-film style stories pick up Legacy of Shadows.